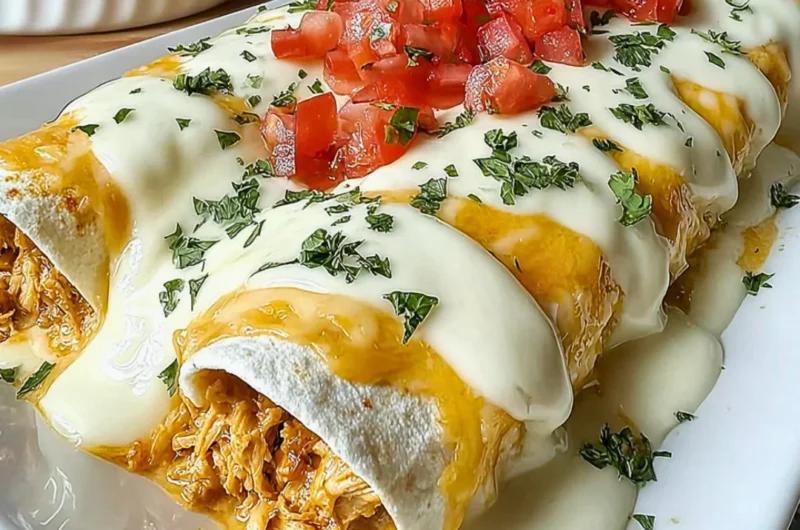
Creamy Queso Chicken Enchiladas for Effortless Family Dinners
There’s something magical about the warmth of a meal shared around the family table — a place where laughter intertwines with the aroma of dinner sizzling away in the oven. One such dish that brings me back to cozy evenings spent with loved ones is my Creamy Queso Chicken Enchiladas. Packed with tender shreds of chicken, comforting cheese, and a hint of spicy goodness, these enchiladas are the epitome of an easy weeknight dinner.
I still remember the night my grandmother taught me how to roll enchiladas. The tortillas were soft and warm, melting in my hands as if they held within them the essence of family togetherness. A spoonful of creamy filling, the satisfying sizzle in the oven, and the anticipation of that golden, bubbly cheese are memories that inspire me to recreate this dish time and time again.
So, gather your loved ones, pour a glass of something refreshing, and let’s dive into the delightful world of Creamy Queso Chicken Enchiladas. This is one you’ll definitely want to pin for later!
Why You’ll Love This Recipe
- Effortless Weeknight Dinner: This recipe whips up in no time, making it perfect for those busy evenings when you need a comforting family meal without the fuss.
- Crowd-Pleasing Flavor: With the combination of savory shredded chicken, creamy queso, and zesty spices, these enchiladas are sure to be a hit with everyone at the table.
- Flexible Ingredients: Whether you want to make it with chicken, turkey, or beef, feel free to customize it using what’s in your pantry!
- Leftover Friendly: This dish tastes even better the next day, making for delicious lunch leftovers that you’ll actually look forward to.
- Great for Meal Prep: You can assemble these enchiladas ahead of time and keep them in the fridge, ready to be baked just before your family gathers around the dinner table.
Ingredients You’ll Need for Creamy Queso Chicken Enchiladas for Effortless Family Dinners
- 2 cups Shredded Chicken (Substitute with shredded beef or turkey if desired.)
- 1 packet Taco Seasoning (Store-bought or homemade for convenience.)
- 1 cup Sour Cream (Greek yogurt can be used as a healthier substitute.)
- 1 cup Shredded Cheddar Cheese (Monterey Jack or Pepper Jack for a spicy twist.)
- 1 can Chopped Green Chilies (Diced jalapeños can be used for more heat.)
- 1 package Velveeta Cheese (Cream cheese can be used, though the flavor may differ.)
- 1 can Diced Tomatoes with Green Chilies (Fresh tomatoes or tomato sauce can work as alternatives.)
- 8 Tortillas (Gluten-free tortillas available for gluten avoidance.)
How to Make Creamy Queso Chicken Enchiladas for Effortless Family Dinners
- Preheat your oven to 350°F (175°C) so it’s heated and ready to bring those enchiladas to perfection.
- In a large mixing bowl, combine the shredded chicken, taco seasoning, sour cream, chopped green chilies, diced tomatoes with green chilies, and half of the shredded cheese. Stir until everything is well coated and beautifully mixed.
- Take a tortilla and place a generous scoop of the chicken mixture in the center. Carefully roll it up and place it seam-side down in a greased baking dish. Repeat this with the remaining tortillas, placing them snugly together.
- Cut your Velveeta cheese into small cubes and scatter them evenly over the rolled enchiladas. This will create that creamy, gooey goodness that you’re dreaming of.
- Sprinkle the remaining shredded cheese on top, ensuring each enchilada is nestled beneath a blanket of cheesy goodness.
- Cover the baking dish with aluminum foil (to prevent burning) and place it in the oven. Bake for about 25-30 minutes, then remove the foil and bake for an additional 10-15 minutes until the cheese is golden and bubbly.
- Allow the enchiladas to cool for a few minutes before serving. Garnish with fresh cilantro or avocado slices for an added burst of flavor.
Variations & Creative Twists
- Make It Veggie: Swap out the chicken for black beans or roasted vegetables for a rich, hearty meatless option.
- Extra Zing: Add sliced jalapeños on top of the enchiladas before baking for a dash of heat that elevates the flavors.
- Top It Off: Serve with a dollop of guacamole or a sprinkle of fresh lime juice for that refreshing contrast to the creamy filling.
- Spanish Twist: Try using Spanish rice or quinoa in place of some of the chicken for a hearty fusion of flavors.
Chef Emma’s Helpful Tips
- Make-Ahead: You can prepare the enchiladas a day in advance! Just cover and refrigerate, then bake when you’re ready.
- Ingredient Swaps: Don’t hesitate to play with the types of cheese; try a blend of pepper jack for added spice or a rich queso fresco for a creamier texture.
- Storage Suggestions: Leftover enchiladas can be stored in an airtight container in the fridge for up to 3 days — reheat in the oven for best results.
Nutrition Information per Serving
- Serving size: 1 enchilada
- Calories: 320
- Carbohydrates: 32g
- Sugars: 3g
- Fat: 16g
- Protein: 20g
- Sodium: 650mg
Frequently Asked Questions
- Can I make this ahead? Yes! You can assemble them and keep them in the fridge until ready to bake.
- Can I use different ingredients? Absolutely! Feel free to substitute shredded beef or turkey, or even go meatless with black beans.
- How do I store leftovers? Store in an airtight container in the fridge for up to 3 days.
- How long does it last? Cooked enchiladas last for about 3 days in the fridge; after that, consider freezing for up to a month.
Wrapping It Up
These Creamy Queso Chicken Enchiladas are more than just dinner — they’re a warm embrace from the kitchen, a canvas for cherished family traditions, and a reason to gather around the table. Each bite is a reminder of cozy nights full of smiles and satisfaction. Save this recipe to your family’s dinner board so it’s ready when you need a cozy treat! Enjoy the love shared through cooking, and happy eating!