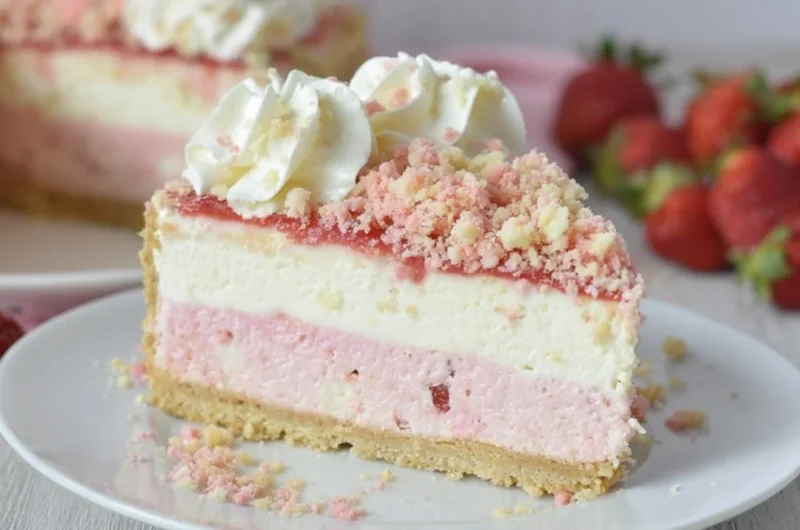
Strawberry Crunch Cheesecake: A Layered Delight
There’s something so comforting about a creamy cheesecake layered with bright, delightful strawberries. It evokes memories of sunny days spent with loved ones, laughter, and sweet treats shared over happy gatherings. Strawberry Crunch Cheesecake perfectly embodies this nostalgic warmth, offering a deliciously light alternative to traditional desserts. With its combination of creamy filling and crunchy topping, it’s a dessert that will transport you to carefree summer afternoons, no matter the season.
This no-bake dessert recipe is both easy to whip up and a crowd-pleaser, perfect for picnics, birthdays, and family gatherings alike. Trust me when I say, this is one you’ll definitely want to pin for later!
Why You’ll Love This Recipe
- No-Bake Wonder: This creamy dessert requires no baking, making it a hassle-free option for busy days.
- Crowd-Pleasing Flavor: The vibrant strawberry layers combined with a crunchy cookie top make this cheesecake a guaranteed hit at any occasion.
- Customizable Topping: With options to change up the crunchy layer, you can tailor this recipe to your flavor preferences.
- Make-Ahead Delight: Perfect for prepping in advance; simply store it in the fridge until you’re ready to serve.
- Easy to Slice: Each slice is a beautiful, comforting layer, perfect for impressing guests without the stress of intricate baking techniques.
What You’ll Need
Crust Ingredients:
- 1 lb vanilla cream cookies (about 34 cookies), divided
- 6 tablespoons butter, melted
Filling Ingredients:
- 1 small box (3.3 oz) strawberry gelatin
- 1 cup boiling water
- 2 bricks (8 oz each) cream cheese, softened
- 3/4 cup granulated sugar
- 2 cups heavy whipping cream
- 1/2 cup powdered sugar
- 10 strawberry wafers (about 4 oz)
Topping:
- About half a small tub of whipped topping, thawed and placed into a pastry bag with a star tip
Let’s Make It Together
Crust Directions:
- Place 26 vanilla cream cookies into a food processor and process until they turn into fine crumbs.
- Add the melted butter to the crumbs and process until you reach a wet sand-like texture.
- Press the mixture evenly into the bottom of a greased 10" springform pan, creating a solid crust.
- Freeze the crust for 15 minutes to set.
Filling Directions:
- In a bowl, combine boiling water and strawberry gelatin. Mix for 2 minutes until fully dissolved. Set aside to cool—do not refrigerate.
- In a separate bowl, beat the softened cream cheese and granulated sugar together until smooth and creamy. Set aside.
- In another bowl, whip the heavy cream and powdered sugar until stiff peaks form, gently scraping down the bowl once to ensure everything is incorporated.
- Divide the whipped cream mixture in half: add one half to the cream cheese mixture and the other half to the cooled gelatin. Beat each bowl until fully incorporated and smooth.
- Pour half of the strawberry mixture onto the chilled crust, and freeze for 15 minutes to set.
- Remove from the freezer, then carefully add the cream cheese mixture on top. Follow with the remaining strawberry layer.
- Coarsely crush the remaining vanilla cream cookies and strawberry wafers. If you desire, add a few drops of food coloring to the crushed cookies for a festive touch.
- Toss the crushed cookies together and sprinkle generously on top of the cheesecake.
- Refrigerate for at least 4 hours or until you’re ready to serve.
- Before serving, top with whipped topping using a pastry bag for an elegant finish.
Fun Ways to Customize It
- Berry Bliss: Add layers of mixed berries such as blueberries or raspberries for a colorful and fruity twist.
- Chocolate Lovers: Swirl in some chocolate ganache or drizzle melted chocolate over the whipped topping for an indulgent flair.
- Nuts and Crunch: Toss in some crushed nuts or granola with the cookie topping for extra texture and a nutty flavor.
- Creative Layers: Try alternating layers using different fruit gelatins, like lemon or orange, for a zesty variation.
Chef Emma’s Helpful Tips
- Make-Ahead Advice: This cheesecake can be prepared up to two days in advance. Just keep it covered in the fridge until ready to serve.
- Ingredient Swaps: Use low-fat cream cheese or whipped topping if you prefer a lighter version without sacrificing creaminess.
- Slicing Tips: For clean slices, dip your knife in hot water before cutting the cheesecake, wiping the blade after each slice.
- Storing Leftovers: Keep any leftovers covered in the fridge for up to four days, though I doubt there will be much left!
What’s Inside – Nutrition Breakdown
- Serving Size: 1 slice (Approx. 1/12 of the cheesecake)
- Calories: 350
- Carbohydrates: 28g
- Sugar: 21g
- Fat: 26g
- Protein: 4g
- Sodium: 250mg
Frequently Asked Questions
Can I make this ahead?
Absolutely! Strawberry Crunch Cheesecake is perfect for making ahead, just store it in the fridge until it’s time to enjoy.
Can I use different ingredients?
Definitely! Feel free to explore different flavors of gelatin and toppings based on your palette or pantry availability.
How do I store leftovers?
Keep the cheesecake covered in the refrigerator for up to four days for the best quality.
How long does it last?
If stored properly, the cheesecake lasts about four days in the fridge, but it’s best enjoyed fresh!
A Cozy Closing Note
This Strawberry Crunch Cheesecake is more than just a dessert; it’s a love letter to the joyful moments we share with our family and friends. The combination of creamy layers and a crunchy topping creates a delectable treat that truly brings people together. Save this recipe to your dessert board so it’s ready when you need a cozy treat! Happy baking, my friends!
Strawberry Crunch Cheesecake
- Total Time: 240 minutes
- Yield: 12 servings 1x
- Diet: Vegetarian
Description
A delightful no-bake cheesecake with layers of creamy filling and crunchy cookie topping, perfect for any gathering.
Ingredients
- 26 vanilla cream cookies (for crust)
- 6 tablespoons butter, melted
- 1 small box (3.3 oz) strawberry gelatin
- 1 cup boiling water
- 2 bricks (8 oz each) cream cheese, softened
- 3/4 cup granulated sugar
- 2 cups heavy whipping cream
- 1/2 cup powdered sugar
- 10 strawberry wafers (about 4 oz)
- About half a small tub of whipped topping, thawed
Instructions
- Place 26 vanilla cream cookies into a food processor and process until they turn into fine crumbs.
- Add the melted butter to the crumbs and process until you reach a wet sand-like texture.
- Press the mixture evenly into the bottom of a greased 10″ springform pan, creating a solid crust.
- Freeze the crust for 15 minutes to set.
- Combine boiling water and strawberry gelatin in a bowl. Mix for 2 minutes until fully dissolved. Set aside to cool—do not refrigerate.
- Beat the softened cream cheese and granulated sugar together in a separate bowl until smooth and creamy. Set aside.
- Whip the heavy cream and powdered sugar in another bowl until stiff peaks form.
- Divide the whipped cream mixture in half: add one half to the cream cheese mixture and the other half to the cooled gelatin.
- Pour half of the strawberry mixture onto the chilled crust, and freeze for 15 minutes to set.
- Add the cream cheese mixture on top, followed by the remaining strawberry layer.
- Coarsely crush the remaining vanilla cream cookies and strawberry wafers; sprinkle them on top.
- Refrigerate for at least 4 hours or until ready to serve.
- Top with whipped topping using a pastry bag for an elegant finish.
Notes
Make this cheesecake up to two days in advance; store covered in the fridge. For clean slices, dip your knife in hot water before cutting.
- Prep Time: 30 minutes
- Cook Time: 0 minutes
- Category: Dessert
- Method: No-Bake
- Cuisine: American
Nutrition
- Serving Size: 1 slice
- Calories: 350
- Sugar: 21g
- Sodium: 250mg
- Fat: 26g
- Saturated Fat: 15g
- Unsaturated Fat: 10g
- Trans Fat: 0g
- Carbohydrates: 28g
- Fiber: 0g
- Protein: 4g
- Cholesterol: 70mg